Installeer de app
How to install the app on iOS
Follow along with the video below to see how to install our site as a web app on your home screen.
Opmerking: This feature may not be available in some browsers.
Je gebruikt een verouderde webbrowser. Het kan mogelijk deze of andere websites niet correct weergeven.
Het is raadzaam om je webbrowser te upgraden of een browser zoals Microsoft Edge of Google Chrome te gebruiken.
Het is raadzaam om je webbrowser te upgraden of een browser zoals Microsoft Edge of Google Chrome te gebruiken.
1/12 Porsche 910 - Rebuild [wip]
- Onderwerp starter GraemeB
- Startdatum
I haven't commented in this thread yet, but I am following with interest. When I was a teenager I was drooling over these large scale kits, but alas, I never had the amount of pocketmoney needed for one of those beauties.
And of course when I did have a job and some money they were out of production, although I did once make the 1/12 JPS Lotus that unfortunately ended between the jaws of a Great Dane (mind you : I do have a replacement for it now, including AM decals for the JPS version that isn't allowed in the mainstream shops now).
And of course when I did have a job and some money they were out of production, although I did once make the 1/12 JPS Lotus that unfortunately ended between the jaws of a Great Dane (mind you : I do have a replacement for it now, including AM decals for the JPS version that isn't allowed in the mainstream shops now).
Evening Chaps, well risen from the dead as they say and time to get this finished .
with the Buick giving me a hell of a time the Porsche started giving me the stink eye , i decided better get this done and having a good power day i decided a bit of paint on parts the best way to start up again.


Above is the Dash Board , had to do some modifications to it as it just didnt look right , turned out ok in the end i think now just waiting for some decals

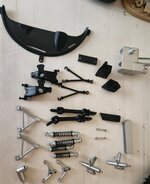
Above are some of the small parts as well as the dash and the modified fuel tank in there final paint , will add a small bit of wash here and there as i see fit to dirty it up a bit , dont want to much dirt, want a new slightly used look .

Now for the tricky bit , above is the a transfer fuel from a Porsche. I need to scratch build this little chap to add to the engine compartment .
Well guys that is that for now, just hope to have some more good power days so that i can get more done , I have added white to chasis shell, need to get some 2k clear varnish and thinner on so as to polish it out , didnt want to go this route but the oils on the hands seem to soften the Tamiya paint and it gets all sticky one , don't know if you chaps have ever experienced this.
thanks a lot for looking and please comments always welcome
Cheers G
with the Buick giving me a hell of a time the Porsche started giving me the stink eye , i decided better get this done and having a good power day i decided a bit of paint on parts the best way to start up again.


Above is the Dash Board , had to do some modifications to it as it just didnt look right , turned out ok in the end i think now just waiting for some decals

Above are some of the small parts as well as the dash and the modified fuel tank in there final paint , will add a small bit of wash here and there as i see fit to dirty it up a bit , dont want to much dirt, want a new slightly used look .

Now for the tricky bit , above is the a transfer fuel from a Porsche. I need to scratch build this little chap to add to the engine compartment .
Well guys that is that for now, just hope to have some more good power days so that i can get more done , I have added white to chasis shell, need to get some 2k clear varnish and thinner on so as to polish it out , didnt want to go this route but the oils on the hands seem to soften the Tamiya paint and it gets all sticky one , don't know if you chaps have ever experienced this.
thanks a lot for looking and please comments always welcome
Cheers G
Good to see you back on this model.
Looks like a nice little scratch building project, depending on how detailed you'd like to achieve that fuel-pass-through.
Oils and other contaminants may have an effect on unprotected paints, unfortunately. Now that you''ll be 2K'ing your coats of paint, the opportunity arises to fully polish the model, enhancing its overall looks.
Hi Ron Yes , but i will not be using 2K , I have taken quite a liking MR Color UV Cut and it seems to work very well and it is also not so heavy on the decals. Must just be careful what washes i use and make sure that i only use enamel based washed on it.Good to see you back on this model.
Looks like a nice little scratch building project, depending on how detailed you'd like to achieve that fuel-pass-through.
Oils and other contaminants may have an effect on unprotected paints, unfortunately. Now that you''ll be 2K'ing your coats of paint, the opportunity arises to fully polish the model, enhancing its overall looks.
Well on the NR that I am completing the Tamiya decals which were a disaster, as the broke up by just looking at them, they held out fine with the UV Cut, no issues at all. but as per usual i always do a test on an unused decal from the specific buildIs that UV cut from mr hobby safe on decals? I heard otherwise.
Looking forward too future updates.
